on
Elixir
Portal
Portal is a game that consists of a series of puzzles that must be solved by teleporting the player’s character and simple objects from one place to another.
In order to teleport, the player uses the Portal gun to shoot doors onto flat planes, like a floor or a wall. Entering one of those doors teleports you to the other:

In this guide we will use the Elixir programming language to build portals by shooting doors of different colors and transferring data between them! We will even learn how we can distribute doors across different machines in our network:
Here is what we will learn:
- Elixir’s interactive shell
- Creating new Elixir projects
- Pattern matching
- Using agents for state
- Using structs for custom data structures
- Extending the language with protocols
- Supervision trees and applications
- Distributed Elixir nodes
Let’s get started!
Installation
Elixir’s website explains how to get Elixir up and running. Just follow the steps described in the Installing Elixir page. Make sure you have version 1.9 or later:
$ elixir -v
Elixir 1.9.0 (compiled with Erlang/OTP 20)
Elixir developers spend quite some time in their Operating System terminals; once installation is complete, you will have some new executables available. One of them is iex. Just type iex in your terminal (or iex.bat if you are on Windows) to get it up and running:
$ iex
Interactive Elixir - press Ctrl+C to exit (type h() ENTER for help)
iex stands for Interactive Elixir. In iex you can type any expression and you will get a result back:
iex> 40 + 2
42
iex> "hello" <> " world"
"hello world"
iex> # This is a code comment
nil
Besides numbers and strings above, we also frequently use the following data types:
iex> :atom           # An atom (known as Identifier/Symbols in other languages)
:atom
iex> [1, 2, "three"] # Lists (typically hold a dynamic amount of items)
[1, 2, "three"]
iex> {:ok, "value"}  # Tuples (typically hold a fixed amount of items)
{:ok, "value"}
Once we finish our portal application, we expect to be able to type the following code inside iex:
# Shoot two doors: one orange, another blue
iex(1)> Portal.shoot(:orange)
{:ok, #PID<0.72.0>}
iex(2)> Portal.shoot(:blue)
{:ok, #PID<0.74.0>}
# Start transferring the list [1, 2, 3, 4] from orange to blue
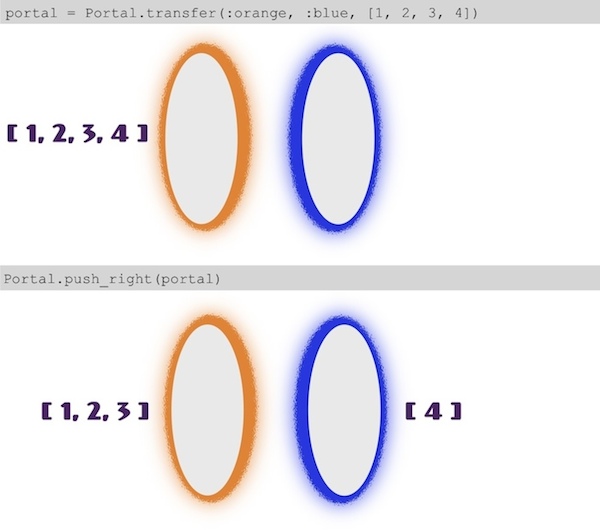
iex(3)> portal = Portal.transfer(:orange, :blue, [1, 2, 3, 4])
#Portal<
:orange <=> :blue
[1, 2, 3, 4] <=> []
>
# Now every time we call push_right, data goes to blue
iex(4)> Portal.push_right(portal)
#Portal<
:orange <=> :blue
[1, 2, 3] <=> [4]
>
Intrigued? Let’s get started.
Our first project
Elixir ships with a tool called Mix. Mix is what Elixir developers use to create, compile and test new projects. Let’s create a project named portal with mix. When creating the project, we will also pass the --sup option that will create a supervision tree. We will explore what the supervision tree does in later sections. For now, just type:
$ mix new portal --sup
The command above created a new directory named portal with some files in it. Change your working directory into portal and run mix test to run the project tests:
$ cd portal
$ mix test
Excellent, we already have a working project with a test suite set up.
Let’s explore the generated project using a text editor. I personally don’t pay much attention to text editors, I mostly use a stock Sublime Text 3 but you can find Elixir support for different text editors on the website under the “Code Editor Support” section.
With your editor open, explore the following directories:
_build- where Mix stores compilation artifactslib- where we put our codemix.exs- where we define our project name, version and dependenciestest- where we define our tests
We can now start an iex session inside our project too. Just run:
$ iex -S mix
Pattern matching
Before we implement our application, we need to talk about pattern matching. The = operator in Elixir is a bit different from the ones we see in other languages:
iex> x = 1
1
iex> x
1
So far so good, what happens if we invert the operands?
iex> 1 = x
1
It worked! That’s because Elixir tries to match the right side against the left side. Since both are set to 1, it works. Let’s try something else:
iex> 2 = x
** (MatchError) no match of right hand side value: 1
Now the sides did not match, so we got an error. We use pattern matching in Elixir to match data structures too. For example, we can use [head|tail] to extract the head (the first element) and tail (the remaining ones) from a list:
iex> [head | tail] = [1, 2, 3]
[1, 2, 3]
iex> head
1
iex> tail
[2, 3]
Matching an empty list against [head | tail] causes a match error:
iex> [head|tail] = []
** (MatchError) no match of right hand side value: []
Finally, we can also use the [head | tail] expression to add elements to the head of a list:
iex> list = [1, 2, 3]
[1, 2, 3]
iex> [0|list]
[0, 1, 2, 3]
Modeling portal doors with Agents
Elixir data structures are immutable. In the examples above, we never mutated the list. We can break a list apart or add new elements to the head, but the original list is never modified.
That said, when we need to keep some sort of state, like the data transfering through a portal, we must use an abstraction that stores this state for us. One such abstraction in Elixir is called an agent. Before we use agents, we need to briefly talk about anonymous functions:
iex> adder = fn a, b -> a + b end
#Function<12.90072148/2 in :erl_eval.expr/5>
iex> adder.(1, 2)
3
An anonymous function is delimited by the words fn and end and an arrow -> is used to separate the arguments from the anonymous function body. We use anonymous functions to initialize, get and update the agent state:
iex> {:ok, agent} = Agent.start_link(fn -> [] end)
{:ok, #PID<0.61.0>}
iex> Agent.get(agent, fn list -> list end)
[]
iex> Agent.update(agent, fn list -> [0|list] end)
:ok
iex> Agent.get(agent, fn list -> list end)
[0]
Note: you will likely get different
#PID<...>values than the ones we show throughout the tutorial. Don’t worry, this is expected!
In the example above, we created a new agent, passing a function that returns the initial state of an empty list. The agent returns {:ok, #PID<0.61.0>}.
Curly brackets in Elixir specify a tuple; the tuple above contains the atom :ok and a process identifier (PID). We use atoms in Elixir as tags. In the example above, we are tagging the agent as successfully started.
The #PID<...> is a process identifier for the agent. When we say processes in Elixir, we don’t mean Operating System processes, but rather Elixir Processes, which are lightweight and isolated, allowing us to run hundreds of thousands of them on the same machine.
We store the agent’s PID in the agent variable, which allows us to send messages to get and update the agent’s state.
We will use agents to implement our portal doors. Create a new file named lib/portal/door.ex with the following contents:
defmodule Portal.Door do
  use Agent

  @doc """
  Starts a door with the given `color`.

  The color is given as a name so we can identify
  the door by color name instead of using a PID.
  """
  def start_link(color) do
    Agent.start_link(fn -> [] end, name: color)
  end

  @doc """
  Get the data currently in the `door`.
  """
  def get(door) do
    Agent.get(door, fn list -> list end)
  end

  @doc """
  Pushes `value` into the door.
  """
  def push(door, value) do
    Agent.update(door, fn list -> [value | list] end)
  end

  @doc """
  Pops a value from the `door`.

  Returns `{:ok, value}` if there is a value
  or `:error` if the hole is currently empty.
  """
  def pop(door) do
    Agent.get_and_update(door, fn
      [] -> {:error, []}
      [h | t] -> {{:ok, h}, t}
    end)
  end
end
In Elixir we define code inside modules, which are basically a group of functions. We have defined four functions above, all properly documented, to work with the agent process. Note we also called use Agent at the top of the module, this will annotate the module so we can start supervised agents in the future. You can learn more about agents in the Agent module documentation.
Let’s give our implementation a try. Start a new shell with iex -S mix. When starting the shell, our new file will be automatically compiled, so we can use it directly:
iex> Portal.Door.start_link(:pink)
{:ok, #PID<0.68.0>}
iex> Portal.Door.get(:pink)
[]
iex> Portal.Door.push(:pink, 1)
:ok
iex> Portal.Door.get(:pink)
[1]
iex> Portal.Door.pop(:pink)
{:ok, 1}
iex> Portal.Door.get(:pink)
[]
iex> Portal.Door.pop(:pink)
:error
Excellent!
One interesting aspect of Elixir is that documentation is treated as a first-class citizen. Since we have documented our Portal.Door code, we can now easily access its documentation from the terminal. Try it out:
iex> h Portal.Door.start_link
Also, regardless if you are writing all of the code snippets in this tutorial by hand or simply copy-and-pasting the code, keep in mind that Elixir ships with a code formatter. So if you want to make sure the code is properly formatted, you can run mix format at the project root at any time:
$ mix format
Depending on the text editor you are using, it will likely have a shortcut to format the code instantly. The formatter is a great tool for compentent teams and those learning Elixir alike, as it gives you immediate feedback on the code you are writing and it ensures consistency within the community.
Let’s move forward.
Portal transfers
Our portal doors are ready so it is time to start working on portal transfers! In order to store the portal data, we are going to create a struct named Portal. Let’s give structs a try in IEx before moving forward:
iex> defmodule User do
...>   defstruct [:name, :age]
...> end
iex> user = %User{name: "john doe", age: 27}
%User{name: "john doe", age: 27}
iex> user.name
"john doe"
iex> %User{age: age} = user
%User{name: "john doe", age: 27}
iex> age
27
A struct is defined inside a module and takes the same name as the module. After the struct is defined, we can use the %User{...} syntax to define new structs or match on them.
Let’s open up lib/portal.ex and add some code to the Portal module. Note the current Portal module already has a function named hello/0. You can remove this function, then add the new contents inside the Portal module:
defstruct [:left, :right]

@doc """
Starts transfering `data` from `left` to `right`.
"""
def transfer(left, right, data) do
  # First add all data to the portal on the left
  for item <- data do
    Portal.Door.push(left, item)
  end

  # Returns a portal struct we will use next
  %Portal{left: left, right: right}
end

@doc """
Pushes data to the right in the given `portal`.
"""
def push_right(portal) do
  # See if we can pop data from left. If so, push the
  # popped data to the right. Otherwise, do nothing.
  case Portal.Door.pop(portal.left) do
    :error   -> :ok
    {:ok, h} -> Portal.Door.push(portal.right, h)
  end

  # Let's return the portal itself
  portal
end
We have defined a Portal struct and a Portal.transfer/3 function (the /3 indicates the function expects three arguments). Let’s give this transfer a try. If IEx is still running, type recompile() to recompile the project (or run iex -S mix again):
# Recompile the project
iex> recompile()

# Start doors
iex> Portal.Door.start_link(:orange)
{:ok, #PID<0.59.0>}
iex> Portal.Door.start_link(:blue)
{:ok, #PID<0.61.0>}

# Start transfer
iex> portal = Portal.transfer(:orange, :blue, [1, 2, 3])
%Portal{left: :orange, right: :blue}

# Check there is data on the orange/left door
iex> Portal.Door.get(:orange)
[3, 2, 1]

# Push right once
iex> Portal.push_right(portal)
%Portal{left: :orange, right: :blue}

# See changes
iex> Portal.Door.get(:orange)
[2, 1]
iex> Portal.Door.get(:blue)
[3]
Our portal transfer seems to work as expected. Note that the data is in reverse order in the left/orange door in the example above. That is expected because we want the end of the list (in this case the number 3) to be the first data pushed into the right/blue door.
We have made some good progress in our implementation, so now let’s work a bit on the presentation. Currently the Portal being printed as a struct: %Portal{left: :orange, right: :blue}. It would be nice if we actually had a printed representation of the portal transfer, allowing us to see the portal processes as we push data.
That’s what we will do next.
Inspecting portals with Protocols
We already know that data can be printed in iex. After all, when we type 1 + 2 in iex, we do get 3 back. However, can we customize how our own types are printed?
Yes, we can! Elixir provides protocols, which allows behaviour to be extended and implemented for any data type, like our Portal struct, at any time.
For example, every time something is printed in our iex terminal, Elixir uses the Inspect protocol. Since protocols can be extended at any time, by any data type, it means we can implement it for Portal too. Open up lib/portal.ex and, at the end of the file, outside the Portal module, add the following:
defimpl Inspect, for: Portal do
  def inspect(%Portal{left: left, right: right}, _) do
    left_door  = inspect(left)
    right_door = inspect(right)

    left_data  = inspect(Enum.reverse(Portal.Door.get(left)))
    right_data = inspect(Portal.Door.get(right))

    max = max(String.length(left_door), String.length(left_data))

    """
    #Portal<
      #{String.pad_leading(left_door, max)} <=> #{right_door}
      #{String.pad_leading(left_data, max)} <=> #{right_data}
    >
    """
  end
end
In the snippet above, we have implemented the Inspect protocol for the Portal struct. The protocol expects one function named inspect to be implemented. The function expects two arguments, the first is the Portal struct itself and the second is a set of options, which we don’t care about for now.
Then we call inspect multiple times, to get a text representation of both left and right doors, as well as to get a representation of the data inside the doors. Finally, we return a string containing the portal presentation properly aligned.
Type recompile() in IEx again (or start a new IEx session) to see the new Portal representation in action:
iex> Portal.Door.start_link(:orange)
{:ok, #PID<0.59.0>}
iex> Portal.Door.start_link(:blue)
{:ok, #PID<0.61.0>}
iex> portal = Portal.transfer(:orange, :blue, [1, 2, 3])
#Portal<
    :orange <=> :blue
  [1, 2, 3] <=> []
>
Now feel free push_right and see what happens!
Shooting supervised doors
We often hear that the Erlang VM, the Virtual Machine Elixir runs on, alongside the Erlang ecosystem are great for building fault-tolerant applications. One of the reasons for such are the so-called supervision trees.
Our code so far is not supervised. Let’s see what happens when we explicitly shutdown one of the door agents:
# Start doors and transfer
iex> Portal.Door.start_link(:orange)
{:ok, #PID<0.59.0>}
iex> Portal.Door.start_link(:blue)
{:ok, #PID<0.61.0>}
iex> portal = Portal.transfer(:orange, :blue, [1, 2, 3])

# First unlink the door from the shell to avoid the shell from crashing
iex> Process.unlink(Process.whereis(:blue))
true
# Send a shutdown exit signal to the blue agent
iex> Process.exit(Process.whereis(:blue), :shutdown)
true

# Try to move data
iex> Portal.push_right(portal)
** (exit) exited in: GenServer.call(:blue, {:update, #Function<2.9997214/1 in Portal.Door.push/2>}, 5000)
    ** (EXIT) no process: the process is not alive or there's no process currently associated with the given name, possibly because its application isn't started
    (elixir) lib/gen_server.ex:1000: GenServer.call/3
    (portal) lib/portal.ex:25: Portal.push_right/1
We got an exit error because there is no :blue door. You can see there is an ** (EXIT) no process message following our function call with more detail. To fix this issue, let’s setup a supervisor that will be responsible for restarting a portal door whenever it crashes.
Remember when we passed the --sup flag when creating our portal project? The --sup option instructs Mix to create an application with a supervision tree. Let’s see the Portal.Application module in `lib/portal/application.ex:
defmodule Portal.Application do
  # See https://hexdocs.pm/elixir/Application.html
  # for more information on OTP Applications
  @moduledoc false

  use Application

  def start(_type, _args) do
    children = [
      # Starts a worker by calling: Portal.Worker.start_link(arg)
      # {Portal.Worker, arg}
    ]

    # See https://hexdocs.pm/elixir/Supervisor.html
    # for other strategies and supported options
    opts = [strategy: :one_for_one, name: Portal.Supervisor]
    Supervisor.start_link(children, opts)
  end
end
The code above outlines an application callback. Every time the application is started, the application callback is invoked, which is then responsible for starting a supervisor with a list of children. Currently the supervisor has no children and that is exactly what we will change next.
Replace the start/2 function above by:
def start(_type, _args) do
  children = [
    {DynamicSupervisor, strategy: :one_for_one, name: Portal.DoorSupervisor}
  ]

  Supervisor.start_link(children, strategy: :one_for_one, name: Portal.Supervisor)
end
Our supervisor has a single child, which is another supervisor! As we can see, supervisors themselves may be supervised, which is what leads to the so-called supervision trees!
Looking at the code above, we can also see there are two types of supervisor. A Supervisor and a DynamicSupervisor. We use the regular Supervisor when its children are known before hand, for example, to start services that must be running when the application starts. For example, if you are writing a web application, you may start the database workers here. If you are writing an embedded device, you may want connect to the wi-fi and so on.
We use the DynamicSupervisor for processes that may be started at any moment, dynamically. For example, we can shoot a new portal door at any time. These doors and their colors are not known before-hand, so we need a DynamicSupervisor to supervise them.
Both supervisors are started with two options: a :strategy, that controls what happens in case of failures, and a :name. The :one_for_one strategy says that if a door crashes, any other door being supervised will continue running. There are strategies like :one_for_all, which means that if one child terminates, all others will be terminated too. The :name option gives a name to that process, so we can refer to it from anywhere else in our code. We gave the name Portal.DoorSupervisor to the DynamicSupervisor.
The last step is to add a function named shoot/1 to the Portal module that receives a color and starts a new door:
@doc """
Shoots a new door with the given `color`.
"""
def shoot(color) do
  DynamicSupervisor.start_child(Portal.DoorSupervisor, {Portal.Door, color})
end
The function above uses the DynamicSupervisor API to reach out to the Portal.DoorSupervisor and start a new child. The second argument given to start_child is known as the “child specification” which tells the supervisor how to start the door, how to shut it down, and so on. We won’t go into details for now. What matters is that the supervisor will start a door by calling Portal.Door.start_link(color), which is exactly the API we have built at the beginning of our journey. This is not a coincidence: the start_link/1 function is the convention used for starting new processes in the Elixir community.
Let’s give our shooting function a try. recompile() the project or start a new iex -S mix session and then:
iex> Portal.shoot(:orange)
{:ok, #PID<0.72.0>}
iex> Portal.shoot(:blue)
{:ok, #PID<0.74.0>}
iex> portal = Portal.transfer(:orange, :blue, [1, 2, 3, 4])
#Portal<
       :orange <=> :blue
  [1, 2, 3, 4] <=> []
>

iex> Portal.push_right(portal)
#Portal<
    :orange <=> :blue
  [1, 2, 3] <=> [4]
>
And what happens if we stop the :blue process now?
iex> Process.exit(Process.whereis(:blue), :shutdown)
true
iex> Portal.push_right(portal)
#Portal<
  :orange <=> :blue
   [1, 2] <=> [3]
>
Notice this time the following push_right/1 operation worked because the supervisor automatically started another :blue portal. Unfortunately the data that was in the blue door before the crash was lost but our system did recover from the crash.
In practice there are different supervision strategies to choose from as well as mechanisms to persist data in case something goes wrong, allowing you to choose the best option for your applications. You can learn more about supervisors in the Supervisor module documentation.
Outstanding!
Distributed transfers
With our portals working, we are ready to give distributed transfers a try. This can be extra awesome if you launch the code on two different machines on the same network. However, if you don’t have another machine handy, one machine will work just fine.
We can start an iex session as node inside of a network by passing the --sname option. Let’s give it a try:
$ iex --sname room1 --cookie secret -S mix
Interactive Elixir - press Ctrl+C to exit (type h() ENTER for help)
iex(room1@jv)1>
You can see this iex terminal is different from the previous ones. Now, we can see room1@jv in the prompt. room1 is the name we gave to the node and jv is the network name of the computer the node is started. In my case, my machine is named jv, but you will get a different result. From now on, we will use room1@COMPUTER-NAME and room2@COMPUTER-NAME and you must replace COMPUTER-NAME by your respective computer names.
In the iex session named room1, let’s shoot a :blue door:
iex(room1@COMPUTER-NAME)> Portal.shoot(:blue)
{:ok, #PID<0.65.0>}
Let’s start another iex session named room2:
$ iex --sname room2 --cookie secret -S mix
Note: the cookie has to be the same on both computers in order for the two Elixir nodes to be able to communicate with each other.
The Agent API out of the box allows us to do cross-node requests. All we need to do is to pass the node name where the named agent we want to reach is running when invoking the Portal.Door functions. For example, let’s reach the blue door from room2:
iex(room2@COMPUTER-NAME)> Portal.Door.get({:blue, :"room1@COMPUTER-NAME"})
[]
This means we can have distributed transfer by simply using node names. Still on room2, let’s try:
iex(room2@COMPUTER-NAME)> Portal.shoot(:orange)
{:ok, #PID<0.71.0>}
iex(room2@COMPUTER-NAME)> orange = {:orange, :"room2@COMPUTER-NAME"}
{:orange, :"room2@COMPUTER-NAME"}
iex(room2@COMPUTER-NAME)> blue = {:blue, :"room1@COMPUTER-NAME"}
{:blue, :"room1@COMPUTER-NAME"}
iex(room2@COMPUTER-NAME)> portal = Portal.transfer(orange, blue, [1, 2, 3, 4])
#Portal<
  {:orange, :room2@COMPUTER-NAME} <=> {:blue, :room1@COMPUTER-NAME}
          [1, 2, 3, 4] <=> []
>
iex(room2@COMPUTER-NAME)> Portal.push_right(portal)
#Portal<
  {:orange, :room2@COMPUTER-NAME} <=> {:blue, :room1@COMPUTER-NAME}
             [1, 2, 3] <=> [4]
>
Awesome. We have distributed transfers working in our code base without changing a single line of code!
Even though room2 is coordinating the transfer, we can still observe the transfer from room1:
iex(room1@COMPUTER-NAME)> orange = {:orange, :"room2@COMPUTER-NAME"}
{:orange, :"room2@COMPUTER-NAME"}
iex(room1@COMPUTER-NAME)> blue = {:blue, :"room1@COMPUTER-NAME"}
{:blue, :"room1@COMPUTER-NAME"}
iex(room1@COMPUTER-NAME)> Portal.Door.get(orange)
[3, 2, 1]
iex(room1@COMPUTER-NAME)> Portal.Door.get(blue)
[4]
Our distributed portal transfer works because the doors are just processes and accessing/pushing the data through doors is done by sending messages to those processes via the Agent API. We say sending a message in Elixir is location transparent: we can send messages to any PID regardless if it is in the same node as the sender or in different nodes of the same network.
Packaging it all up
Elixir also ships with a feature called releases. A release is a self-contained directory that consists of your application code, all of its dependencies, plus the whole Erlang Virtual Machine (VM) and runtime. Once a release is assembled, it can be packaged and deployed to a target as long as the target runs on the same operating system (OS) distribution and version as the machine assembling the release.
You can assemble the release by running mix release. Let’s also pass the MIX_ENV=prod environment variable, as we want to assemble a release optimized for production:
$ MIX_ENV=prod mix release
* assembling portal-0.1.0 on MIX_ENV=prod

Release created at _build/prod/rel/portal!

# To start your system
_build/prod/rel/portal/bin/portal start
A release was created inside _build/prod/rel/portal. You can package everything in this directory into a zip file and ship it to production. Typically teams assemble their release at the end of their continuous integration pipeline. Feel free to explore this directory in your editor.
Inside the _build/prod/rel/portal directory, you will find a bin/portal script, which is the entry-point to the system. From here you can start the system, run RPC commands, connect to a remotely running node and so on. Give it a try:
$ _build/prod/rel/portal/bin/portal start
There is a lot more to releases and the Elixir documentation does a good job of outlining their ins and outs and all possible configurations.
Wrapping up
So we have reached the end of this guide on how to get started with Elixir! It was a fun ride and we quickly went from manually starting doors processes to shooting fault-tolerant doors for distributed portal transfers, which we can package and ship to production.
We challenge you to continue learning and exploring more of Elixir by taking your portal application to the next level:
Add a
Portal.push_left/1function that transfers the data in the other direction. How can you avoid the code duplication existing between thepush_left/1andpush_right/1functions?Learn more about ExUnit, Elixir’s testing framework, and write tests for the functionality we have built so far. Remember we already have a default structure laid out in the
testdirectory.Generate HTML documentation for your project with ExDoc.
Push your project to an external source, like GitHub, and publish a package using the Hex package manager.
We welcome you to explore our website and read our Getting Started guide or many of the available resources to learn more about Elixir and our vibrant community.
Finally, huge thanks to Augie De Blieck Jr. for the drawings in this tutorial.
See you around!

Elixir
José Valim is the creator of Elixir. He is also co-founder of Plataformatec, a consultancy based in Brazil, a book author, and an active conference speaker.